🧆 Recipe Categories
Street Snacks
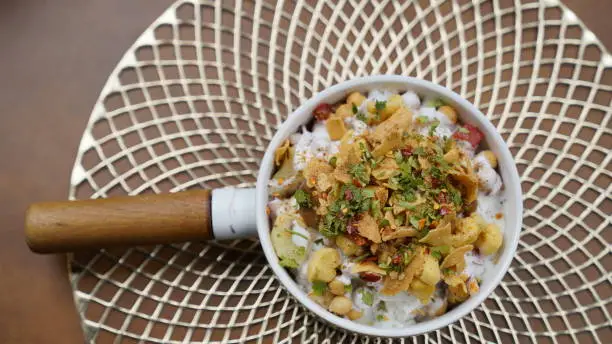
Deconstructed Samosa Chaat
Experience the vibrant flavors of Indian street food with our easy-to-make Deconstructed Samosa Chaat. This recipe takes the beloved crispy samosa and transforms it into a delightful, layered snack, perfect for parties or a quick savory bite. Instead of deep-frying individual samosas, we use store-bought mini samosas (or even crushed regular samosas) as the base, making it incredibly quick. The magic happens with the medley of chutneys, yogurt, and fresh toppings that bring this dish to life. It's a symphony of textures and tastes – spicy, sweet, tangy, and creamy all in one spoonful. This dish is not just a snack; it's an experience, a journey through the bustling streets of India right in your kitchen.
Ingredients:
- 6-8 mini samosas (fried or air-fried until crispy)
- 1/2 cup plain yogurt, whisked
- 1/4 cup tamarind chutney
- 1/4 cup mint-coriander chutney
- 1/4 cup chopped red onion
- 1/4 cup chopped tomato
- 2 tbsp chopped fresh cilantro
- 1 tbsp chaat masala
- 1/4 cup sev (crispy chickpea noodles)
- Pomegranate seeds for garnish (optional)
Instructions:
- Arrange the crispy samosas on a serving plate or in individual bowls, lightly crushing them if desired.
- Drizzle generously with whisked yogurt, ensuring each samosa piece is coated.
- Spoon over the tamarind chutney and then the mint-coriander chutney in a zigzag pattern.
- Scatter the chopped red onion and tomato evenly over the top.
- Sprinkle a generous amount of chaat masala over the entire dish.
- Garnish with fresh cilantro and sev. Add pomegranate seeds if using for an extra burst of flavor and color.
- Serve immediately to enjoy the crispiness of the samosas before they soften. This chaat is best enjoyed fresh!
This recipe serves 2-3 people and takes approximately 15 minutes to prepare. It's an excellent choice for a quick appetizer or a satisfying evening snack. The balance of sweet, sour, and spicy notes makes it incredibly addictive. Feel free to adjust the amount of chutneys to your preference. For an extra kick, add a pinch of red chili powder. You can also add boiled chickpeas or diced potatoes for a more substantial version. The beauty of chaat lies in its versatility and the ability to customize it to your taste. Enjoy the explosion of flavors!
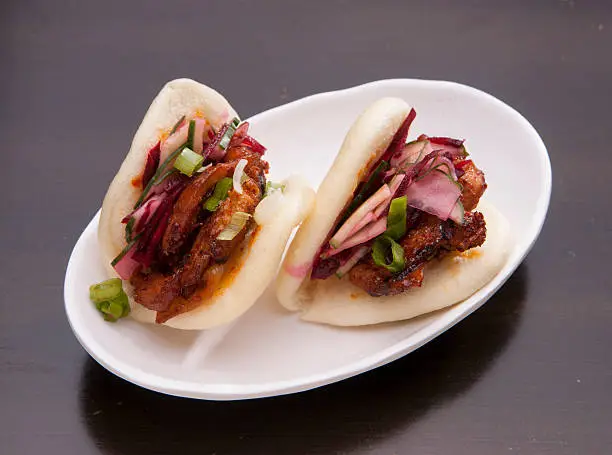
Spicy Korean BBQ Pork Belly Baos
Dive into the delectable world of Asian street food with our Spicy Korean BBQ Pork Belly Baos. These fluffy steamed buns are filled with succulent, spicy pork belly, crisp pickled vegetables, and a drizzle of sriracha mayo, creating a harmonious blend of textures and bold flavors. The pork belly is marinated in a rich gochujang-based sauce, slow-cooked to tender perfection, and then seared for a delightful crisp edge. The contrast between the soft bao bun and the flavorful filling is simply irresistible. This recipe is a fantastic way to impress guests or treat yourself to an elevated snack experience. It’s a labor of love, but every bite is worth the effort, transporting you straight to the bustling night markets of Korea.
Ingredients:
- 1 lb pork belly, skin removed, cut into 1-inch pieces
- 1/4 cup gochujang (Korean chili paste)
- 2 tbsp soy sauce
- 1 tbsp rice vinegar
- 1 tbsp sesame oil
- 1 tbsp brown sugar
- 2 cloves garlic, minced
- 1 tsp grated ginger
- 12 steamed bao buns (store-bought or homemade)
- 1/2 cup quick pickled cucumbers (thinly sliced cucumber, rice vinegar, sugar, salt)
- 1/4 cup quick pickled carrots (julienned carrots, rice vinegar, sugar, salt)
- Sriracha mayo for drizzling
- Fresh cilantro and sliced green onions for garnish
Instructions:
- In a bowl, combine gochujang, soy sauce, rice vinegar, sesame oil, brown sugar, minced garlic, and grated ginger to make the marinade.
- Add pork belly pieces to the marinade, ensuring they are well coated. Marinate for at least 30 minutes, or preferably 2-4 hours in the refrigerator.
- Heat a large skillet or wok over medium-high heat. Add the marinated pork belly and cook until browned and caramelized, about 10-15 minutes, stirring occasionally. If needed, add a splash of water to deglaze the pan and create a sauce.
- While pork cooks, prepare your pickled vegetables by combining sliced cucumbers and julienned carrots with a splash of rice vinegar, a pinch of sugar, and a dash of salt. Let sit for at least 10 minutes.
- Steam the bao buns according to package instructions until warm and fluffy.
- To assemble: Open each bao bun, place a few pieces of the cooked pork belly inside. Top with pickled cucumbers and carrots.
- Drizzle generously with sriracha mayo. Garnish with fresh cilantro and sliced green onions.
- Serve immediately and enjoy the explosion of flavors!
This recipe yields 12 baos and is perfect for a small gathering or a decadent snack. The preparation time is about 45 minutes, plus marinating time. The spiciness of the gochujang is beautifully balanced by the sweetness of the brown sugar and the tang of the pickled vegetables. For a vegetarian option, you can substitute pork belly with marinated and pan-fried firm tofu or mushrooms. Experiment with different toppings like crushed peanuts or crispy fried shallots for added texture. These baos are a true testament to the versatility and deliciousness of street food, bringing an authentic taste of Asia to your home.
Quick Bakes

Speedy Mini Pizzas on English Muffins
Craving pizza but short on time? Our Speedy Mini Pizzas on English Muffins are your ultimate solution! These delightful individual pizzas are incredibly easy to assemble, bake in minutes, and are perfect for a quick lunch, after-school snack, or a fun dinner for the kids. Using English muffins as the base provides a wonderfully chewy and slightly crispy crust that holds up well to toppings. You can customize these mini pizzas with any toppings you love, making them a versatile option for everyone in the family. It's a fantastic way to use up leftover ingredients in your fridge and satisfy those pizza cravings without the fuss of making dough from scratch. Get ready for a delicious, cheesy, and satisfying bite!
Ingredients:
- 4 English muffins, split
- 1/2 cup pizza sauce or marinara
- 1 cup shredded mozzarella cheese
- Your favorite toppings: pepperoni, diced bell peppers, sliced mushrooms, black olives, cooked sausage, etc.
- Optional: a pinch of dried oregano or Italian seasoning
Instructions:
- Preheat your oven to 375°F (190°C). Lightly toast the split English muffins in a toaster or under the broiler for 2-3 minutes until slightly golden. This helps prevent them from getting soggy.
- Place the toasted English muffin halves on a baking sheet.
- Spread about 1-2 tablespoons of pizza sauce evenly over each muffin half.
- Sprinkle a generous amount of shredded mozzarella cheese over the sauce.
- Arrange your desired toppings on top of the cheese.
- Bake for 8-12 minutes, or until the cheese is melted, bubbly, and the crusts are golden brown. If you like a crispier crust, you can broil for the last minute, watching carefully to prevent burning.
- Carefully remove from the oven and let cool for a minute before serving. They will be hot!
This recipe makes 8 mini pizzas and is ready in under 20 minutes from start to finish. It's an ideal activity for kids to help with, allowing them to choose their own toppings and create their personalized pizzas. For a healthier twist, use whole wheat English muffins and load up on fresh vegetables. You can also experiment with different cheeses like provolone or a blend of Italian cheeses. These mini pizzas are incredibly versatile and always a crowd-pleaser. Enjoy the simplicity and deliciousness of homemade pizza in a flash!
Cheesy Garlic Knots from Scratch
Elevate your snack game with our irresistible Cheesy Garlic Knots! These soft, chewy knots are bursting with garlic-butter flavor and a hint of Parmesan cheese, making them the perfect accompaniment to any meal or a delightful snack on their own. Made from a simple yeast dough, the process of shaping them into knots is surprisingly fun and rewarding. The aroma of baking garlic knots will fill your kitchen, promising a treat that’s far superior to any store-bought version. They are brushed with a generous amount of garlic-herb butter after baking, ensuring every bite is moist and flavorful. These knots are an absolute must-try for garlic bread lovers and a fantastic way to practice your baking skills.
Ingredients:
- For the Dough:
- 1 cup warm water (105-115°F / 40-46°C)
- 1 packet (2 1/4 tsp) active dry yeast
- 1 tsp sugar
- 2 1/2 - 3 cups all-purpose flour, plus more for dusting
- 1 tsp salt
- 2 tbsp olive oil
- For the Garlic Butter Topping:
- 1/2 cup unsalted butter, melted
- 4 cloves garlic, minced
- 2 tbsp fresh parsley, chopped
- 1/4 cup grated Parmesan cheese
- Pinch of red pepper flakes (optional)
Instructions:
- Make the Dough: In a large bowl, combine warm water, yeast, and sugar. Let sit for 5-10 minutes until foamy.
- Stir in 2 cups of flour, salt, and olive oil until combined. Gradually add remaining flour, 1/4 cup at a time, until a soft, slightly sticky dough forms.
- Turn dough onto a lightly floured surface and knead for 5-7 minutes until smooth and elastic.
- Place dough in a lightly oiled bowl, turning once to coat. Cover with plastic wrap and let rise in a warm place for 1-1.5 hours, or until doubled in size.
- Shape the Knots: Punch down the risen dough. Divide into 12-16 equal pieces. Roll each piece into an 8-10 inch rope. Tie each rope into a knot and tuck the ends.
- Place knots on a baking sheet lined with parchment paper, leaving some space between them. Cover loosely and let rise for another 20-30 minutes.
- Bake: Preheat oven to 400°F (200°C). Bake knots for 15-20 minutes, or until golden brown.
- Prepare Garlic Butter: While knots bake, melt butter in a small saucepan. Add minced garlic, chopped parsley, and red pepper flakes (if using). Simmer gently for 2-3 minutes to infuse flavors.
- Finish: As soon as knots come out of the oven, brush generously with the garlic butter. Sprinkle with grated Parmesan cheese.
- Serve warm.
This recipe yields 12-16 garlic knots and takes about 2.5-3 hours total, including rising time, but the active prep is minimal. They are fantastic with pasta dishes, soups, or simply enjoyed on their own. For an extra cheesy twist, you can add a small cube of mozzarella inside each knot before tying. These garlic knots are a testament to the joy of homemade baking, offering a comforting and flavorful experience that’s hard to beat. They freeze well too, so you can make a big batch and enjoy them later!
Spice Kicks

Crispy Spicy Jalapeño & Cheddar Fritters
Ignite your taste buds with our Crispy Spicy Jalapeño & Cheddar Fritters! These golden-brown bites are packed with the fiery kick of fresh jalapeños, balanced by the creamy richness of sharp cheddar cheese, all encased in a light and crispy batter. Perfect for an appetizer, game day snack, or a bold side dish, these fritters deliver a satisfying crunch followed by a burst of spicy, cheesy goodness. They are surprisingly easy to make and are guaranteed to be a hit with anyone who loves a little heat. Serve them with a cool ranch dip or a tangy sour cream to mellow the spice, or enjoy them plain for a full-on flavor assault!
Ingredients:
- 1 cup all-purpose flour
- 1 tsp baking powder
- 1/2 tsp salt
- 1/4 tsp black pepper
- 1/2 cup milk
- 1 large egg, lightly beaten
- 2-3 fresh jalapeños, finely diced (remove seeds for less heat)
- 1 cup shredded sharp cheddar cheese
- Vegetable oil for frying
Instructions:
- In a large bowl, whisk together flour, baking powder, salt, and black pepper.
- In a separate bowl, whisk together milk and egg.
- Pour the wet ingredients into the dry ingredients and mix until just combined. Do not overmix; a few lumps are fine.
- Fold in the finely diced jalapeños and shredded cheddar cheese until evenly distributed.
- Heat about 2-3 inches of vegetable oil in a deep skillet or Dutch oven over medium-high heat to 350°F (175°C).
- Drop spoonfuls of the batter (about 1.5-2 tablespoons per fritter) into the hot oil, being careful not to overcrowd the pan.
- Fry for 3-4 minutes per side, or until golden brown and cooked through.
- Remove fritters with a slotted spoon and place them on a paper towel-lined plate to drain excess oil.
- Serve hot with your favorite dipping sauce.
This recipe yields about 12-15 fritters and takes approximately 30 minutes to prepare. The key to perfect fritters is maintaining the oil temperature and not overcrowding the pan, which can lower the oil temperature and result in greasy fritters. For a milder version, use fewer jalapeños or substitute some with diced bell peppers. You can also experiment with different cheeses like Monterey Jack or a spicy pepper jack for an extra kick. These fritters are a fantastic way to add some excitement to your snack repertoire, offering a delightful blend of heat, cheese, and crispy texture. They are truly addictive!

Fiery Chilli Garlic Butter Popcorn
Transform your movie night or snack time with our Fiery Chilli Garlic Butter Popcorn! This isn't your average buttered popcorn; it's an explosion of savory, spicy, and garlicky flavors that will leave you craving more. The combination of smoked paprika, cayenne pepper, and garlic powder infused into melted butter creates an incredibly aromatic and addictive coating for your freshly popped kernels. It’s quick to prepare, making it an ideal last-minute snack when you need a serious flavor boost. Forget bland popcorn – this recipe elevates it to a gourmet experience, perfect for those who love a little heat and a lot of flavor in their snacks. Get ready for a popcorn revolution!
Ingredients:
- 1/2 cup unpopped popcorn kernels
- 2 tbsp vegetable oil (for popping)
- 1/4 cup unsalted butter, melted
- 1 tsp garlic powder
- 1/2 tsp smoked paprika
- 1/4 - 1/2 tsp cayenne pepper (adjust to your spice preference)
- 1/4 tsp salt, or to taste
- Optional: 1 tbsp nutritional yeast for cheesy flavor, chopped fresh cilantro for garnish
Instructions:
- Heat vegetable oil in a large pot or deep saucepan with a lid over medium-high heat. Add 2-3 popcorn kernels; once they pop, add the rest of the kernels in a single layer.
- Cover the pot, shaking occasionally, and cook until the popping slows to several seconds between pops. Remove from heat and pour popped popcorn into a large serving bowl.
- In a small bowl, combine the melted butter, garlic powder, smoked paprika, cayenne pepper, and salt. Stir well to combine.
- Pour the seasoned butter mixture over the hot popcorn. Toss gently but thoroughly to ensure all kernels are evenly coated.
- Taste and adjust seasoning if needed. If desired, sprinkle with nutritional yeast for a cheesy kick or fresh cilantro for freshness.
- Serve immediately and enjoy your spicy, flavorful popcorn!
This recipe makes a large bowl of popcorn, perfect for sharing, and takes about 10-15 minutes total. The key is to toss the popcorn while it's still hot so the butter and spices adhere well. For an even more intense garlic flavor, you can sauté a minced clove of fresh garlic in the butter for a minute before adding the spices. This popcorn is not just a snack; it's an experience, transforming a simple treat into a culinary adventure. Be warned: it's highly addictive!
Fusion Snacks
Spiced Chickpea & Avocado Indo-Mex Sliders
Embark on a culinary journey with our Spiced Chickpea & Avocado Indo-Mex Sliders, a delightful fusion of Indian spices and Mexican zest. These mini burgers feature a flavorful chickpea patty infused with traditional Indian spices like cumin, coriander, and turmeric, topped with creamy avocado, fresh salsa, and a hint of lime, all nestled in soft slider buns. It's a vibrant, vegetarian snack that's both hearty and refreshing, offering a unique blend of familiar and exotic flavors. Perfect for a light meal, party appetizer, or a creative snack, these sliders are a testament to the exciting possibilities of fusion cuisine. Get ready for a taste sensation that bridges two incredible culinary worlds!
Ingredients:
- For the Chickpea Patties:
- 1 can (15 oz) chickpeas, rinsed and drained
- 1/4 cup finely chopped red onion
- 2 tbsp chopped fresh cilantro
- 1 tsp ground cumin
- 1 tsp ground coriander
- 1/2 tsp turmeric powder
- 1/4 tsp cayenne pepper (optional)
- 1/2 cup breadcrumbs
- 1 large egg
- Salt and pepper to taste
- 2 tbsp olive oil for pan-frying
- For Assembly:
- 12 slider buns, lightly toasted
- 2 ripe avocados, mashed with a squeeze of lime juice
- 1/2 cup fresh salsa (store-bought or homemade)
- Optional: thin slices of red onion, extra cilantro
Instructions:
- Make the Patties: In a large bowl, mash the chickpeas with a fork until mostly smooth but still a bit chunky.
- Add chopped red onion, cilantro, cumin, coriander, turmeric, cayenne pepper (if using), breadcrumbs, egg, salt, and pepper. Mix well until everything is combined and the mixture holds together.
- Divide the mixture into 12 equal portions and shape them into small patties, about 1/2 inch thick.
- Heat olive oil in a large non-stick skillet over medium heat. Cook the patties for 4-5 minutes per side, or until golden brown and heated through.
- Assemble Sliders: Lightly toast the slider buns. Spread a generous layer of mashed avocado on the bottom half of each bun.
- Place a cooked chickpea patty on top of the avocado.
- Spoon a tablespoon of fresh salsa over the patty.
- Top with the other half of the bun. Garnish with extra red onion slices or cilantro if desired.
- Serve immediately.
This recipe makes 12 sliders and takes approximately 40 minutes to prepare. These sliders are incredibly flavorful and satisfying, proving that vegetarian snacks can be just as exciting as their meat-based counterparts. For a spicier kick, you can add finely chopped green chilies to the patty mixture. You can also experiment with different toppings like a dollop of spicy yogurt or a sprinkle of crumbled feta cheese. These Indo-Mex sliders are a fantastic example of how diverse culinary traditions can come together to create something truly innovative and delicious. Enjoy the fusion!
Spicy Indian Masala Nachos with Paneer
Get ready for a flavor explosion with our Spicy Indian Masala Nachos with Paneer! This innovative fusion dish takes the classic Mexican nachos and infuses them with the bold, aromatic spices of India, creating an unforgettable snack experience. Crispy tortilla chips are loaded with a savory mixture of crumbled paneer (Indian cheese), bell peppers, onions, and a rich tomato-based masala sauce, all topped with melted cheese and fresh cilantro. It's a perfect blend of textures and tastes – crunchy, creamy, spicy, and tangy – making it an ideal dish for sharing at gatherings or indulging in a solo snack session. This recipe is a testament to how well different culinary traditions can complement each other, resulting in something truly extraordinary.
Ingredients:
- 1 bag (10-12 oz) tortilla chips
- 1 tbsp vegetable oil
- 1 cup crumbled paneer
- 1 small red onion, finely chopped
- 1 bell pepper (any color), diced
- 1-2 green chilies, finely chopped (adjust to heat preference)
- 1 tsp ginger-garlic paste
- 1/2 tsp turmeric powder
- 1 tsp ground cumin
- 1 tsp ground coriander
- 1/2 tsp garam masala
- 1/2 cup tomato puree or crushed tomatoes
- 1/4 cup water
- Salt to taste
- 1.5 cups shredded Monterey Jack or cheddar cheese blend
- Fresh cilantro, chopped, for garnish
- Optional: a dollop of sour cream or plain yogurt for serving
Instructions:
- Preheat oven to 375°F (190°C).
- Heat oil in a large skillet over medium heat. Add chopped red onion and bell pepper; sauté for 3-4 minutes until softened.
- Add green chilies and ginger-garlic paste; sauté for another minute until fragrant.
- Stir in turmeric, ground cumin, ground coriander, and garam masala. Cook for 1 minute, stirring constantly, until spices are aromatic.
- Add tomato puree and water. Bring to a simmer and cook for 5-7 minutes, stirring occasionally, until the sauce thickens slightly. Season with salt.
- Add crumbled paneer to the masala sauce and mix gently until paneer is coated and heated through. Remove from heat.
- Spread half of the tortilla chips in a single layer on a large oven-safe platter or baking sheet.
- Spoon half of the paneer masala mixture over the chips, then sprinkle with half of the shredded cheese.
- Repeat with the remaining chips, paneer masala, and cheese.
- Bake for 8-12 minutes, or until the cheese is melted and bubbly and the chips are lightly golden.
- Remove from oven, garnish generously with fresh cilantro. Serve hot, optionally with a dollop of sour cream or yogurt.
This recipe serves 4-6 people as a snack and takes about 35-40 minutes to prepare. The beauty of these nachos lies in the rich, complex flavors of the Indian spices combined with the familiar comfort of cheesy nachos. You can adjust the spice level by adding more or fewer green chilies and cayenne pepper. For a non-vegetarian version, you could substitute paneer with cooked, shredded chicken. These Masala Nachos are a fantastic example of a successful culinary fusion, offering a unique and incredibly satisfying snack that’s sure to be a conversation starter. Get ready to impress your taste buds!
No-Fry Zone
Crispy Air Fryer Sweet Potato Fries
Enjoy the satisfying crunch of fries without the deep-fried guilt with our Crispy Air Fryer Sweet Potato Fries! These vibrant, naturally sweet fries are seasoned with a hint of paprika and garlic powder, then air-fried to golden perfection. They are a healthier alternative to traditional fries, packed with vitamins and fiber, and incredibly easy to make. The air fryer ensures they come out wonderfully crispy on the outside and tender on the inside, making them an ideal side dish, a guilt-free snack, or a delightful accompaniment to your favorite burger. Say goodbye to soggy oven fries and hello to perfectly crisp, flavorful sweet potato goodness!
Ingredients:
- 2 large sweet potatoes, peeled and cut into 1/4-inch thick fries
- 1 tbsp olive oil
- 1/2 tsp smoked paprika
- 1/2 tsp garlic powder
- 1/4 tsp salt, or to taste
- Optional: a pinch of cayenne pepper for a kick
Instructions:
- In a large bowl, toss the sweet potato fries with olive oil until evenly coated.
- Sprinkle with smoked paprika, garlic powder, salt, and cayenne pepper (if using). Toss again to ensure all fries are well seasoned.
- Preheat your air fryer to 380°F (195°C) for 5 minutes.
- Place the seasoned sweet potato fries in a single layer in the air fryer basket. Do not overcrowd; cook in batches if necessary to ensure even crisping.
- Air fry for 15-20 minutes, shaking the basket every 5-7 minutes, until the fries are golden brown and crispy. Cooking time may vary slightly depending on your air fryer model and the thickness of your fries.
- Remove from the air fryer and serve immediately with your favorite dipping sauce, such as a spicy mayo or a cool ranch dip.
This recipe serves 2-3 people and takes about 25-30 minutes total. The key to super crispy air fryer fries is to avoid overcrowding the basket, allowing the hot air to circulate freely around each fry. For extra crispiness, you can soak the cut sweet potatoes in cold water for 30 minutes before seasoning and air frying; just make sure to pat them thoroughly dry. These air fryer sweet potato fries are a delicious and healthy way to satisfy your fry cravings, offering a perfect balance of sweetness and savory spice. They are incredibly versatile and pair well with almost anything!
Mediterranean Hummus & Veggie Wraps
Discover a refreshing and satisfying snack with our Mediterranean Hummus & Veggie Wraps! These vibrant wraps are packed with creamy hummus, crisp fresh vegetables, and tangy feta cheese, all rolled up in a soft tortilla. They are incredibly quick to assemble, require no cooking, and are perfect for a light lunch, a healthy snack on the go, or a picnic. The combination of earthy hummus, crunchy veggies, and salty feta creates a delightful texture and flavor profile that is both wholesome and delicious. It's a fantastic way to incorporate more fresh produce into your diet and enjoy a burst of Mediterranean sunshine in every bite. Customize with your favorite greens and protein for endless variations!
Ingredients:
- 4 large whole wheat tortillas or spinach wraps
- 1/2 cup hummus (store-bought or homemade)
- 1/2 cup chopped cucumber
- 1/2 cup chopped bell peppers (any color)
- 1/4 cup chopped red onion (optional, for a sharper bite)
- 1/4 cup crumbled feta cheese
- 1/4 cup Kalamata olives, pitted and sliced
- 1 cup mixed greens (spinach, romaine, or spring mix)
- Optional: a drizzle of olive oil, a sprinkle of dried oregano
Instructions:
- Lay each tortilla flat on a clean surface.
- Spread about 2 tablespoons of hummus evenly over each tortilla, leaving a small border around the edges.
- Arrange a layer of mixed greens over the hummus.
- Evenly distribute the chopped cucumber, bell peppers, red onion (if using), crumbled feta cheese, and sliced Kalamata olives over the greens.
- If desired, drizzle with a little olive oil and sprinkle with dried oregano.
- Carefully roll up each tortilla tightly, tucking in the sides as you go to create a neat wrap.
- Cut each wrap in half diagonally or into smaller pinwheels for easier serving.
- Serve immediately or wrap tightly in plastic wrap and refrigerate for up to 4 hours.
This recipe makes 4 wraps and takes only about 15 minutes to prepare. These wraps are incredibly versatile; feel free to add grilled chicken, falafel, or roasted vegetables for a more substantial meal. For a vegan option, simply omit the feta cheese. The freshness of the vegetables combined with the savory hummus and tangy feta makes these wraps a truly satisfying and healthy snack. They are perfect for meal prep, allowing you to quickly grab a nutritious bite when you're on the go. Enjoy the simplicity and deliciousness of these Mediterranean-inspired wraps!
🧠 Blog: SnackTalk
5-Minute Spicy Snacks You Can Make Tonight
Discover how to whip up incredibly flavorful and spicy snacks in under five minutes using ingredients you likely already have. From quick chili-lime roasted nuts to instant spicy cucumber bites, these recipes are perfect for those sudden cravings when time is of the essence. We delve into the art of maximizing flavor with minimal effort, focusing on pantry staples and clever hacks. Learn about the best spices to keep on hand for an instant heat boost and how to balance spiciness with other flavor profiles like tanginess and sweetness. This post is your go-to guide for satisfying your spicy snack desires without spending hours in the kitchen. Get ready to spice up your life, one quick bite at a time!
How to Build a Perfect Party Platter
Elevate your entertaining game with our comprehensive guide on building the ultimate party platter. This article covers everything from selecting a diverse range of textures and flavors to artful arrangement techniques. We explore various themes, from Mediterranean mezze to an Asian-inspired tasting board, and offer tips on balancing savory and sweet elements. Learn about ideal cheese and charcuterie pairings, the importance of fresh produce, and how to incorporate dips and spreads for added interest. We also provide advice on portioning and presentation to ensure your platter is not only delicious but also a visual masterpiece. Impress your guests with a platter that caters to every palate and dietary preference.
Fusion Street Food That Surprises
Dive into the exciting world of fusion street food, where culinary boundaries are blurred to create innovative and surprising flavor combinations. This blog post highlights some of the most creative and delicious fusion dishes emerging from street food scenes around the globe. From Korean BBQ tacos to Indian-spiced pizzas and Japanese-Peruvian ceviche, we explore how chefs are blending traditional techniques and ingredients to craft entirely new culinary experiences. Get inspired to experiment with unexpected pairings in your own kitchen and discover how to transform familiar ingredients into something extraordinary. Prepare to have your taste buds tantalized by these bold and imaginative creations!
Healthy vs. Hearty: Best of Both Bites
Navigating the world of snacks often means choosing between healthy and hearty options. This article argues that you don't have to compromise! We explore strategies for enjoying both nutritious and indulgent snacks, offering recipes and tips for balancing your cravings. Learn how to make hearty snacks healthier without sacrificing flavor, and how to make healthy snacks more satisfying. From nutrient-dense energy bites to guilt-free cheesy delights, we provide practical advice for making smart snack choices that align with your lifestyle and preferences. Discover how to fuel your body and satisfy your soul with the best of both bites, ensuring your snacking habits are both delicious and beneficial.
📲 Add-ons & Tools
- Snack Mood Selector (“What Should I Munch?”)
- Quick Filter: Under 10 Mins / 5 Ingredients / Vegan / Sweet
- Save Your Bites (Recipe Book feature)
- Snack Box Shop (Ready-to-cook kits or ingredients)
At BiteStirline, we're constantly innovating to enhance your snacking journey. Our "Snack Mood Selector" is an interactive tool designed to help you discover the perfect recipe based on your current craving, whether you're feeling spicy, sweet, savory, or something entirely new. The "Quick Filter" allows for effortless navigation, enabling you to find recipes that fit your time constraints, ingredient availability, or dietary preferences with just a few clicks. The "Save Your Bites" feature acts as your personal digital recipe book, allowing you to bookmark and organize your favorite snacks for easy access. And for ultimate convenience, our "Snack Box Shop" provides ready-to-cook kits or curated ingredient bundles, bringing the BiteStirline experience directly to your doorstep. These tools are crafted to make your culinary exploration seamless and enjoyable, ensuring that every visit to BiteStirline is productive and inspiring.
🌟 Customer Satisfaction
At BiteStirline, your satisfaction is our top priority. We are dedicated to providing a seamless, inspiring, and delicious experience for every user. Our team is constantly working to curate the best snack recipes, develop intuitive tools, and ensure the highest quality of content. We value your feedback immensely, as it helps us to continuously improve and tailor our platform to your needs and desires. From the moment you land on our homepage to the last bite of a delicious snack you've created, we want your journey with BiteStirline to be nothing short of exceptional. We believe that good food brings joy, and our goal is to spread that joy through every recipe, every blog post, and every interaction. Thank you for being a part of the BiteStirline community; your trust and enthusiasm drive us forward.
"BiteStirline has completely transformed my snack game! The recipes are so creative and surprisingly easy. I've tried so many new flavors and my family loves them all. The 'Snack Mood Selector' is genius!"
— Priya S., Home Cook Extraordinaire"As a college student, quick and tasty snacks are essential. BiteStirline delivers exactly that. The '5-Minute Spicy Snacks' blog post saved my life during exam season. Highly recommend!"
— Rahul M., Student Foodie"I'm always looking for healthy yet exciting options for my kids, and BiteStirline's 'Kids' Bites' section is a goldmine. The Rainbow Fruit Pinwheels are a huge hit!"
— Sarah L., Busy Parent"The fusion recipes on this site are next level. I never thought I'd make Indo-Mex sliders at home, but the instructions were so clear. BiteStirline truly inspires culinary adventure."
— David C., Fusion Food Lover⚠️ Disclaimer
The information provided on BiteStirline (the "Website") is for general informational and entertainment purposes only. All recipes, cooking tips, and dietary advice are provided "as is" without any representations or warranties, express or implied. While we strive to provide accurate and up-to-date information, we make no representations or warranties of any kind, express or implied, about the completeness, accuracy, reliability, suitability, or availability with respect to the Website or the information, products, services, or related graphics contained on the Website for any purpose. Any reliance you place on such information is therefore strictly at your own risk.
Allergies and Dietary Restrictions: Recipes on this Website may contain common allergens such as nuts, dairy, gluten, soy, eggs, and shellfish. It is your sole responsibility to be aware of your own and your guests' allergies and dietary restrictions. We strongly advise you to carefully review the ingredient lists for each recipe and to take all necessary precautions to prevent allergic reactions. BiteStirline does not assume any liability for adverse reactions to food consumed or items prepared using recipes from this Website. If you have severe allergies or specific dietary needs, please consult with a qualified healthcare professional or a registered dietitian before preparing or consuming any recipes found on this site.
Nutritional Information: Any nutritional information provided on this Website (e.g., calorie counts, macronutrient breakdowns) is an estimate only and should not be considered a substitute for professional nutritional advice. Nutritional values can vary significantly based on ingredient brands, cooking methods, portion sizes, and other factors. We recommend using a reliable nutritional calculator or consulting with a registered dietitian for precise nutritional information tailored to your specific needs.
Kitchen Safety: Cooking involves inherent risks, including but not limited to cuts, burns, and other injuries. Always exercise caution and follow safe kitchen practices when preparing any recipes from this Website. Ensure that you use appropriate kitchen tools and equipment safely, and supervise children closely if they are assisting in the kitchen. BiteStirline is not responsible for any accidents, injuries, or damages that may occur during the preparation or consumption of food based on our recipes.
Recipe Results: The results of any recipe may vary depending on a variety of factors, including ingredient quality, cooking equipment, individual cooking skills, and adherence to instructions. We cannot guarantee that you will achieve the exact results depicted or described on the Website. Recipes are provided as a guide, and we encourage users to adapt them to their taste and available resources. Experimentation is part of the culinary journey!
External Links: This Website may contain links to external websites that are not provided or maintained by or in any way affiliated with BiteStirline. Please note that BiteStirline does not guarantee the accuracy, relevance, timeliness, or completeness of any information on these external websites. The inclusion of any links does not necessarily imply a recommendation or endorse the views expressed within them. We encourage you to read the privacy policies and terms of service of any third-party websites you visit.
By using this Website, you hereby acknowledge and agree to this disclaimer and its terms. If you do not agree with any part of this disclaimer, you must not use our Website. We reserve the right to modify this disclaimer at any time without prior notice. Your continued use of the Website following any changes signifies your acceptance of those changes.